Musical Chessboard
My Vision
I want a chessboard that can sing for me. Eight rows and columns: eight notes in a diatonic scale. Well, technically a diatonic scale has seven distinct pitches, but the idea is some mapping can be done here. Though the musical specifics are not yet finalized, my current vision is to generate chordal ambience dictated by board state.
For those wondering, “Isn’t this just a MIDI controller copying Novation’s Launchpad X Grid Controller?”:
Can you play chess comfortably on your MIDI controller?
As a more practical application, this chessboard can be used in collaboration with a chess engine to help players see blunders or missed wins.
Hardware
The first and foremost problem is hardware: building a beautiful chessboard which relays board state information to a computer. By beautiful, I mean a classic-looking chessboard - no exposed electronic components. At the lowest level, the problem is to create an 8x8 array of cleverly hidden sensors.
First prototype
My first prototype did not follow the beauty standard. On this first attempt, my idea was to use photo-resistors as the sensor for detecting piece existence. When a piece covers the photo-resistor, it blocks the light and changes the resistance, which can then be measured and processed on an IC. I made a chessboard pattern with the holes for the sensor on a wooden tile via laser cutter. I couldn’t even complete 2 rows before realizing this was not the right approach. Along with disobeying my “hidden sensor” rule, this design made it annoyingly difficult to wire each resistor to an Arduino Uno. I needed a more organized, secure system.
New plan
I ditched the photo-resistors. I need something more hidden: capacitive sensors. However, I reasoned that the Georgia Tech electronic shop would be skeptical to donate 64 of them to me, and buying them myself doesn’t sound like a great investment. Solution: make my own capacitive sensor. The story and proof-of-concept behind this can be read here.
Basically, each tile will be bound to the top plate of its own capacitor. In my next prototype, the chess tiles will not be physically connected to each other. Instead, they will be free to move vertically while still held in a tight 8x8 matrix.
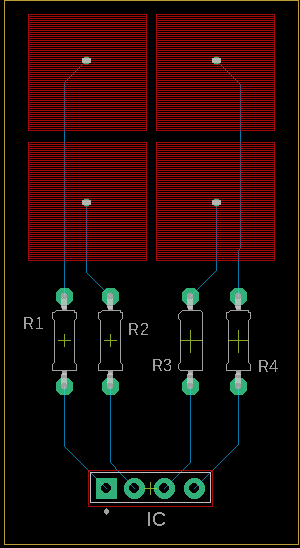
At the time of the first prototype, I had not yet gotten into PCB design and fabrication, which started with my modular synthesizer project. Now that I have these skills, I realize that I can apply them to make a grid of bottom plates. Here is an example of a 2x2 grid concept made in EAGLE.
This is a top-down view. The filled-in red squares are the bottom plates of each capacitor. The blue lines are traces on the other side of the PCB. Dielectric material and a top plate can then be fitted on a red square, creating a capacitor. A grid frame will need to be made using a laser cutter to ensure that adjacent top plates will not touch.
Of course, I need to find an organized way to ground the top plates as well. Perhaps the grid frame can be designed such that tiny wires can run up the walls and connect to them. This part will take some more brainstorming and experimentation.
Regardless, the main idea is here. Just like my other projects, this one is still a work-in-progress. This project is the newest, hence the lack of content. I realize that there is so much more work to be made, but it excites me.


